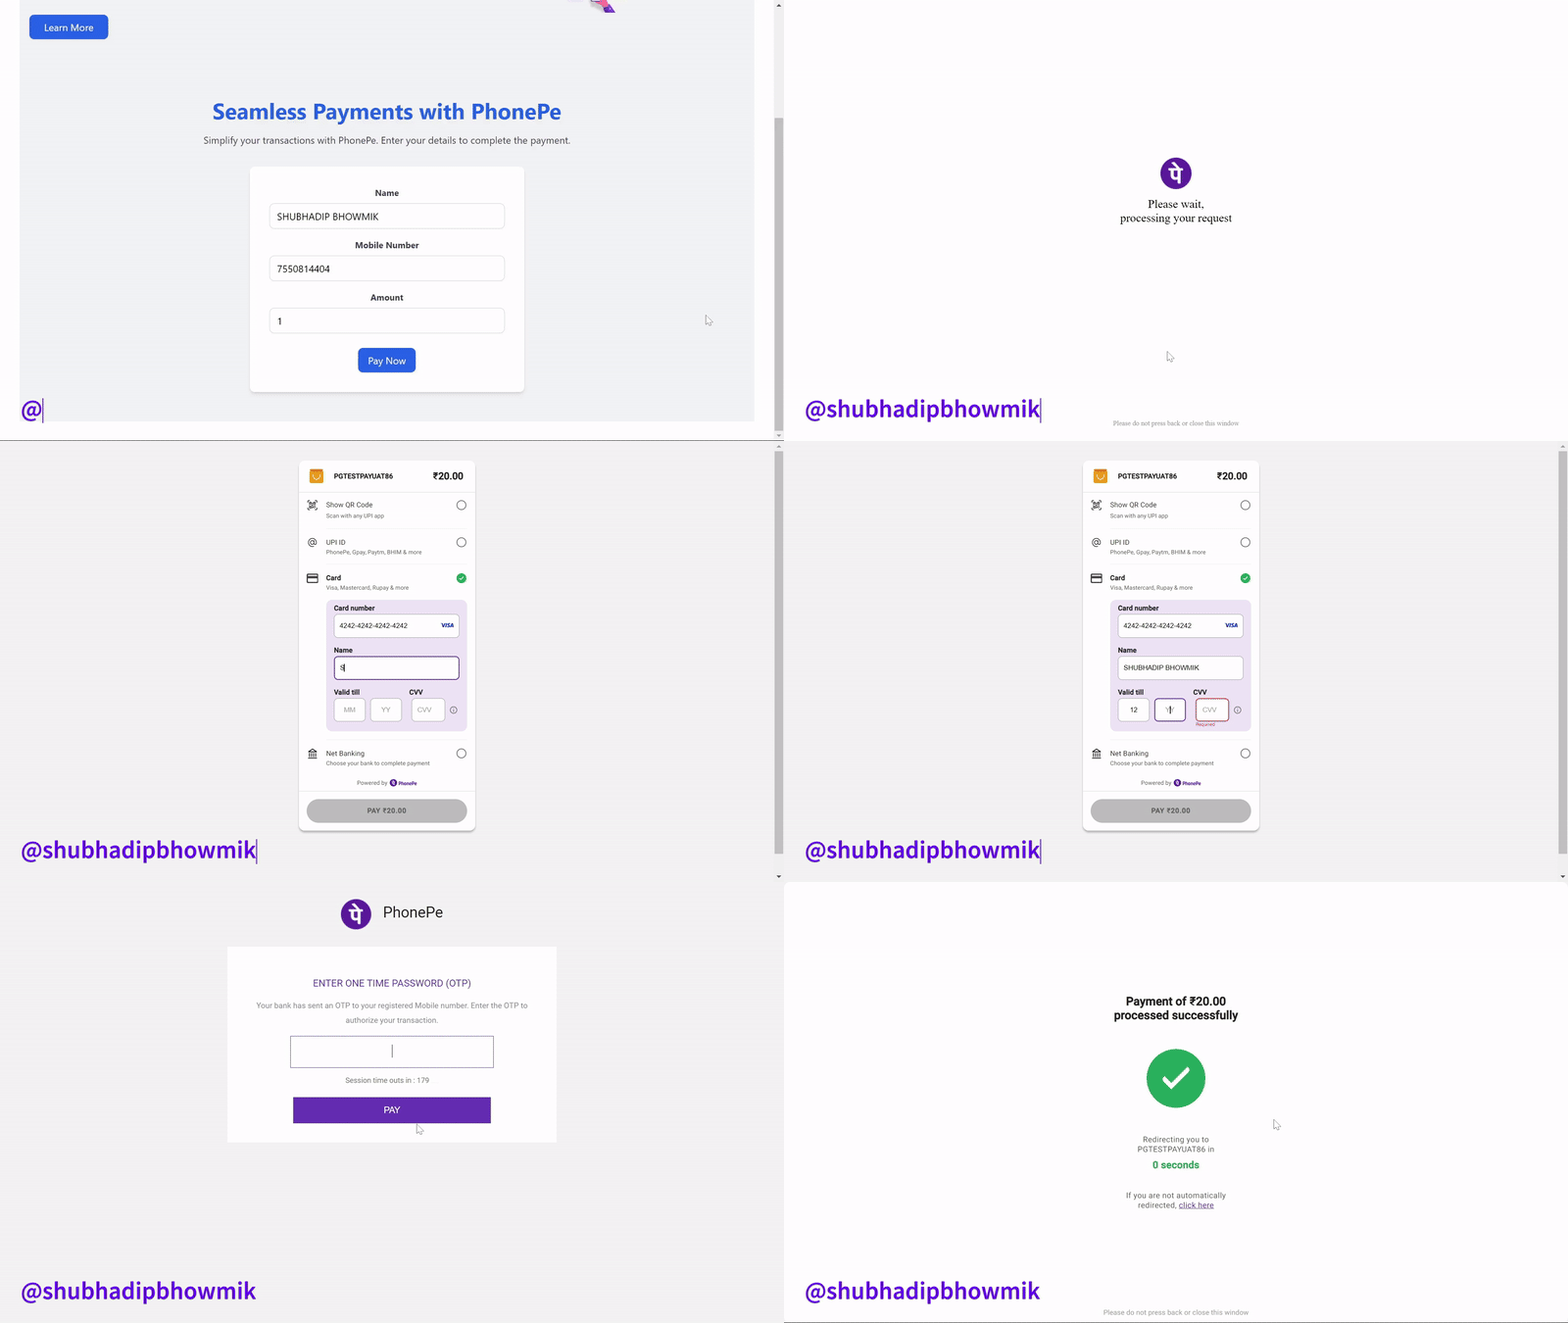
In this simple step-by-step guide, we will learn how to integrate the PhonePe payment gateway with Node and Express as the backend and React in the frontend. After reading this guide, you will be able to integrate the PhonePe payment gateway effectively. All the steps are very simple and easy to follow.

Project Setup
To follow this blog, you need some project prerequisites:
- Node.js + NPM
- Visual Studio Code
- Any Browser
Now let's set up our project. First, create a folder with any name. For this tutorial, we will use the phonepe-payment-gateway folder. Now open this folder using VS Code. Create 2 folders inside this folder named:
- client
- server
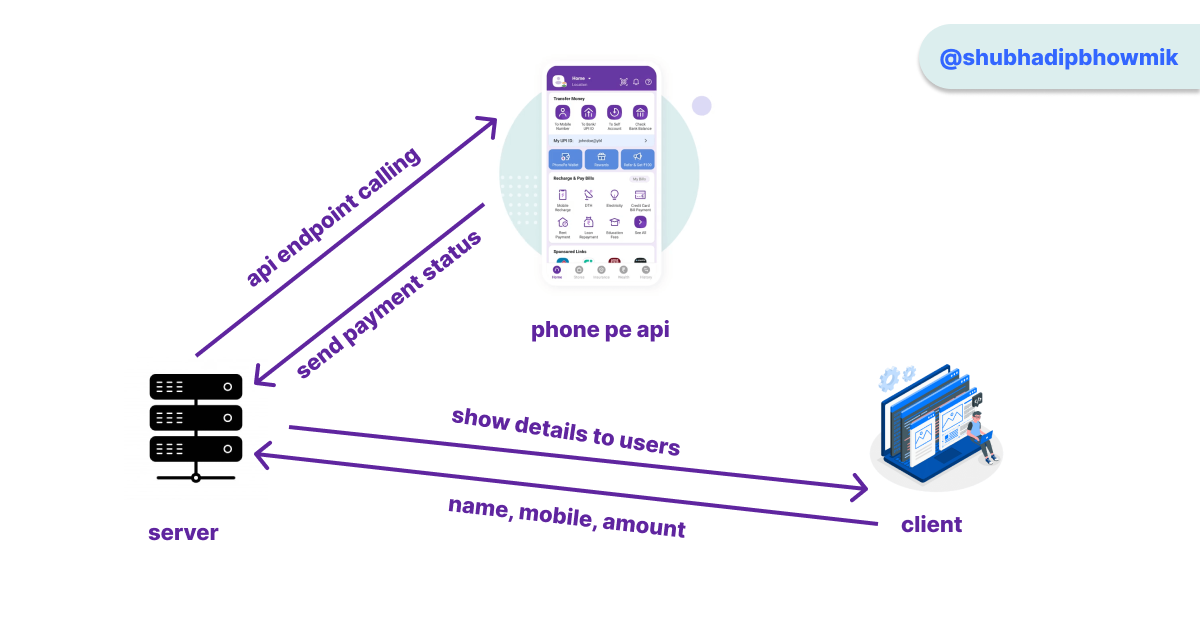
Before starting the coding part lets try to understand the phone pe payment gateway api flow. For making it clear I have created this API Flow diagram.

User will fill the data like name, mobile, amount. Then it will hit our server api end point. Then our server will will send a request to the phone pe api end point. Which will send back the status of payment. Which we will get in server response then again wi will send the response to the client.
Frontend Setup
For this tutorial, I am using React as the frontend library, and for styling, I have used Tailwind CSS. Now click on the client folder and open the terminal. To install React, run this command:
npm create vite@latest .Use . after vite@latest so that it will install the React in the current directory (client).
Then select React as framework and Javascript as language.
Install Tailwind CSS
Install tailwindcss and its peer dependencies, then generate your tailwind.config.js and postcss.config.js files.
Run these commands
npm install -D tailwindcss postcss autoprefixer
npx tailwindcss init -p
Configure your template paths
Update the tailwind.config.js file with the following code:
/** @type {import('tailwindcss').Config} */
export default {
  content: [
    "./index.html",
    "./src/**/*.{js,ts,jsx,tsx}",
  ],
  theme: {
    extend: {},
  },
  plugins: [],
}
Update index.css to use Tailwind CSS
@tailwind base;
@tailwind components;
@tailwind utilities;
Update App.jsx
export default function App() {
  return (
    <h1 className="text-3xl font-bold underline">
      Hello world!
    </h1>
  )
}
Run Frontend
npm run devIn this way you will be able to see the React application in your browser.
Frontend Designing
Now we are ready to design our frontend. To keep it simple we will create a form with 3 basic fields for taking users name, mobile, amount. Because will more focus on the backend.
Ok before designing the pages we need some dependencies. So let's install dependencies for React.
- axios => To make HTTP requests
- react-router-dom => To handle routing
To install these dependencies, run the following command:
npm install axios react-router-domCreate Some Files
/src/components/Header.jsx
import React from 'react';

const Header = () => {
  return (
    <header className="bg-blue-600 text-white shadow-lg">
      <div className="container mx-auto flex justify-between items-center p-4">
        <h1 className="text-2xl font-bold">My Website</h1>
        <nav>
          <ul className="flex space-x-4">
            <li>
              <a href="#home" className="hover:text-gray-200">Home</a>
            </li>
            <li>
              <a href="#about" className="hover:text-gray-200">About</a>
            </li>
            <li>
              <a href="#services" className="hover:text-gray-200">Services</a>
            </li>
            <li>
              <a href="#contact" className="hover:text-gray-200">Contact</a>
            </li>
          </ul>
        </nav>
      </div>
    </header>
  );
};

export default Header;
/src/components/Hero.jsx
import React from 'react';

const Hero = () => {
  return (
    <section className="bg-gray-100">
      <div className="container mx-auto flex flex-col md:flex-row items-center justify-between py-12 px-4">
        {/* Left side: Hero text */}
        <div className="text-center md:text-left md:w-1/2">
          <h1 className="text-4xl font-bold text-blue-600">
            Seamless Payments with PhonePe
          </h1>
          <p className="mt-4 text-gray-700">
            Simplify your transactions with easy integration of PhonePe in your platform. Experience fast, secure, and reliable payments for your business or app.
          </p>
          <a
            href="#learn-more"
            className="inline-block mt-6 bg-blue-600 text-white py-2 px-6 rounded-lg shadow hover:bg-blue-500"
          >
            Learn More
          </a>
        </div>

        {/* Right side: Image */}
        <div className="mt-8 md:mt-0 md:w-1/2 flex justify-center">
          <img
            src="https://www.phonepe.com/webstatic/8220/static/8470cfd6cd867c1ebeb64ed00084ff4b/063af/investment-desktop.png" // Placeholder image, replace with an actual graphic
            alt="PhonePe Integration"
            className="w-[300px] h-auto"
          />
        </div>
      </div>
    </section>
  );
};

export default Hero;
/src/components/Payment.jsx
import React, { useState } from 'react';
import axios from 'axios';

const Payment = () => {
  const [name, setName] = useState('SHUBHADIP BHOWMIK');
  const [mobile, setMobile] = useState('7550814404');
  const [amount, setAmount] = useState('1');
  const [loading, setLoading] = useState(false);

  // Handle each input separately
  const handleNameChange = (e) => {
    setName(e.target.value);
  };

  const handleMobileChange = (e) => {
    setMobile(e.target.value);
  };

  const handleAmountChange = (e) => {
    setAmount(e.target.value);
  };

  // Handle form submission
  const handleSubmit = async(e) => {
    e.preventDefault();
    setLoading(true);
    const data = {
      name,
      mobile,
      amount,
      MUID: "MUID" + Date.now(),
      transactionId: "TID" + Date.now(),
    };

    await axios.post('http://localhost:8000/payment', data)
      .then((response) => {
        if(response.data && response.data.data.instrumentResponse.redirectInfo.url) {
          window.location.href = response.data.data.instrumentResponse.redirectInfo.url
        }
        setLoading(false);
      })
      .catch((error) => {
        console.log(error);
        setLoading(false);
      });
  };

  return (
    <section className="bg-gray-100">
      <div className="container mx-auto flex flex-col items-center py-12 px-4">
        {/* Hero Section */}
        <div className="text-center mb-8">
          <h1 className="text-4xl font-bold text-blue-600">
            Seamless Payments with PhonePe
          </h1>
          <p className="mt-4 text-gray-700">
            Simplify your transactions with PhonePe. Enter your details to complete the payment.
          </p>
        </div>

        {/* Form Section */}
        <div className="bg-white shadow-md rounded-lg p-8 w-full max-w-md">
          <form onSubmit={handleSubmit}>
            {/* Name Input */}
            <div className="mb-4">
              <label className="block text-gray-700 text-sm font-bold mb-2" htmlFor="name">
                Name
              </label>
              <input
                type="text"
                id="name"
                value={name}
                onChange={handleNameChange}
                className="w-full px-3 py-2 border border-gray-300 rounded-lg shadow-sm focus:outline-none focus:ring-2 focus:ring-blue-500"
                placeholder="Enter your name"
                required
              />
            </div>

            {/* Mobile Input */}
            <div className="mb-4">
              <label className="block text-gray-700 text-sm font-bold mb-2" htmlFor="mobile">
                Mobile Number
              </label>
              <input
                type="tel"
                id="mobile"
                value={mobile}
                onChange={handleMobileChange}
                className="w-full px-3 py-2 border border-gray-300 rounded-lg shadow-sm focus:outline-none focus:ring-2 focus:ring-blue-500"
                placeholder="Enter your mobile number"
                required
              />
            </div>

            {/* Amount Input */}
            <div className="mb-4">
              <label className="block text-gray-700 text-sm font-bold mb-2" htmlFor="amount">
                Amount
              </label>
              <input
                type="number"
                id="amount"
                value={amount}
                onChange={handleAmountChange}
                className="w-full px-3 py-2 border border-gray-300 rounded-lg shadow-sm focus:outline-none focus:ring-2 focus:ring-blue-500"
                placeholder="Enter amount"
                required
              />
            </div>

            {/* Submit Button */}
            <div className="mt-6">
              <button
                type="submit"
                className="bg-blue-600 text-white py-2 px-4 rounded-lg shadow hover:bg-blue-500"
              >
                {loading ? 'Processing...' : 'Pay Now'}
              </button>
            </div>
          </form>
        </div>
      </div>
    </section>
  );
};

export default Payment;
Now you are done with the design part. Now create the routes for frontend.
import './App.css'
import Header from './components/Header'
import Hero from './components/Hero'
import Payment from './components/Payment'
import { Routes, Route } from 'react-router-dom'
import Success from './components/Success'

function App() {
  return (
    <>
      <Header />
      {/* Uncomment Hero if needed */}
      <Hero />
      <Payment />
      <Routes>
        <Route path="/success" element={<Success />} />
      </Routes>
    </>
  )
}

export default App
Main.jsx
import { createRoot } from 'react-dom/client'
import App from './App.jsx'
import './index.css'
import { BrowserRouter } from 'react-router-dom'

createRoot(document.getElementById('root')).render(
    <BrowserRouter>
      <App />
    </BrowserRouter>
)
Now frontend is complete. Now we will create our backend with Node and Express. Go open server folder and create a new file named server.js. Then run this command to initialize the npm.
npm initkeep everything as default. In package.json file, make some update.
"main": "server.js",
  "scripts": {
    "start": "nodemon server.js"
  }
Now for this project we will need some dependencies. So run the following command to install. Make sure you are in server folder.
express=> to create servernodemon=> to run server without refreshing pageaxios=> to make http requestscors=> to allow cross-origin requestscrypto=> for hashing
npm i express nodemon axios cors cryptoNow open server.js and add the following code. Before you start coding open this page of phonepe developer page for more details. Phone Pe API Guide
Now write the code. Then we will understand our code line by line.
const express = require('express');
const cors = require('cors');
const crypto = require('crypto');
const axios = require('axios');

const app = express();
app.use(cors());
app.use(express.json());
app.use(express.urlencoded({ extended: true }));

app.get('/', (req, res) => {
    res.send('Hello World!');
});

let SALT_KEY = '96434309-7796-489d-8924-ab56988a6076';
let MERCHANT_ID = 'PGTESTPAYUAT86';

app.post('/payment', async(req, res) => {
    try {
        // get data provided by client
        let {
            name,
            mobile,
            amount,
            MUID,
            transactionId
        } = req.body;

        const data = {
            merchantId: MERCHANT_ID,
            merchantTransactionId: transactionId,
            name: name,
            mobile: mobile,
            amount: amount * 100,
            SALT_KEY: SALT_KEY,
            MUID: MUID,
            redirectUrl: `http://localhost:8000/status?id=${transactionId}`,
            redirectMode: 'POST',
            mobileNumber: mobile,
            paymentInstrument:{
                type: 'PAY_PAGE',
            }
        };

        const keyIndex = 1;
        const payLoad = JSON.stringify(data);
        const payLoadMain = Buffer.from(payLoad).toString('base64');

        const string = payLoadMain + '/pg/v1/pay' + SALT_KEY;

        const sha256 = crypto.createHash('sha256').update(string).digest('hex');
        const checkSum = sha256 + '###' + keyIndex;

        const PROD_URL = 'https://api-preprod.phonepe.com/apis/pg-sandbox/pg/v1/pay';

        const options = {
            method: 'POST',
            url: PROD_URL,
            headers: {
                'accept': 'application/json',
                'Content-Type': 'application/json',
                'X-VERIFY': checkSum
            },
            data: {
                request: payLoadMain
            }
        };

        await axios(options)
            .then((response) => {
                res.json(response.data);
            })
            .catch((error) => {
                res.status(500).json({
                    error: error
                });
            });


    } catch (error) {
        console.log(error);
    }
});

// get status of payment
app.post('/status', async (req, res) => {
    try {
        const merchantTransactionId = req.query.id; // Use query params if sent via query
        const merchantId = MERCHANT_ID;

        const keyIndex = 1;
        const string = `/pg/v1/status/${merchantId}/${merchantTransactionId}` + SALT_KEY;
        const sha256 = crypto.createHash('sha256').update(string).digest('hex');
        const checkSum = sha256 + '###' + keyIndex;

        const options = {
            method: 'GET',
            url: `https://api-preprod.phonepe.com/apis/pg-sandbox/pg/v1/status/${merchantId}/${merchantTransactionId}`,
            headers: {
                accept: 'application/json',
                'Content-Type': 'application/json',
                'X-VERIFY': checkSum,
                'X-MERCHANT-ID': merchantId
            }
        };

        await axios(options)
            .then((response) => {
                if (response.data.success === true) {
                    const url = 'http://localhost:5173/success';
                    return res.redirect(url);
                } else {
                    return res.json(response.data);
                }
            })
            .catch((error) => {
                res.status(500).json({
                    error: error
                });
            });

    } catch (error) {
        console.log(error);
    }
});


app.listen(8000, () => {
    console.log('Server started on port 8000');
});
Now run this command to start the server. Then you will be able to see the response in your browser.
npm run startTo check the status of our server open http://localhost:8000/. It will show you Hello World!. It means our server is up and running. To test our payment gateway, go to http://localhost:5173/ or the client port. and fill the details like name, mobile, amount. If you have implemented the payment gateway correctly as described then it will redirect you to Phone Pay Payment Page. Now to test phone pe payment use dummy bedit card provided by phone pe.
Debit Card
“card_number”: “4242424242424242”,
“card_type”: “DEBIT_CARD”,
“card_issuer”: “VISA”,
“expiry_month”: 12,
“expiry_year”: 2023,
“cvv”: “936”
Credit Card
“card_number”: “4208585190116667”,
“card_type”: “CREDIT_CARD”,
“card_issuer”: “VISA”,
“expiry_month”: 06,
“expiry_year”: 2027,
“cvv”: “508”
NOTE : The OTP to be used on the Bank Page: 123456
If your payment is successful, it will redirect you to Success Page.
Understand the Backend Logic
/payment route
- Get data from frontend using
req.body - Store data in
datanamed variable. (which will be send to phone pe server using api) - Generate the payLoad and checkSum using this code
const keyIndex = 1;
const payLoad = JSON.stringify(data);
const payLoadMain = Buffer.from(payLoad).toString('base64');
const string = payLoadMain + '/pg/v1/pay' + SALT_KEY;
const sha256 = crypto.createHash('sha256').update(string).digest('hex');
const checkSum = sha256 + '###' + keyIndex;- Make a post request to phone pe server using axios
- Return response to frontend
/status route
- Get data from frontend using
req.query - Store data in
datanamed variable. (which will be send to phone pe server using api) - Generate the payLoad and checkSum using this code
const keyIndex = 1;
const payLoad = JSON.stringify(data);
const payLoadMain = Buffer.from(payLoad).toString('base64');
const string = payLoadMain + '/pg/v1/status/' + MERCHANT_ID + '/' + merchantTransactionId + SALT_KEY;
const sha256 = crypto.createHash('sha256').update(string).digest('hex');
const checkSum = sha256 + '###' + keyIndex;- Make a get request to phone pe server using axios
- Return response to frontend
Congratulations! You have completed the tutorial. I hope it has helped you in understanding the PhonePe payment gateway integration. If you have any questions or suggestions, please don't hesitate to contact me. I'm here to help you!
For more insights on React and other web development topics, follow me for updates. shubhadipbhowmik
